 |
| What's Hot! | Products/ Tools | EFI Tuning | Basic Tuning | Advanced Tuning | Chassis Tuning | Advertise with us |
CATEGORIES FOR ARTICLE LINKS BELOW
![]()
DOT Help |
How a three port and four port electronic boost controller works and controls boost pressure
3 Port Vs 4 port boost controllers
Contributed by: Enginebasics.com
With any turbocharged engine, boost control becomes one of the first priorities to making good reliable power. Boost control can be done two basic ways: mechanically or electronically. This article will focus on electronic boost control and the solenoids that make this sort of control possible. If there was just one solenoid and one way of electronically controlling turbo boost pressure, than there wouldn’t be much to this article. While there are multiple ways of controlling boost pressure electronically, we will focus on the differences between 3 port and 4 port boost pressure control solenoids.
What is a 3 port Boost Control Solenoid?
A 3 port electronic boost controller is a controller that has 3 ports on it. No surprise there. What that means is that the solenoid has 3 ports of entry/exit available. Those ports can move fluids in or out of the solenoid based on what you’re looking to accomplish. With a 3 port boost controller there are two methods of controlling boost. We will show both methods below and also talk about the pro’s and con’s of each.
1. Routing controller to single port internal wastegate or bottom port only of external wastegate
If you don’t know how a wastegate actuator works to control boost be sure to read our articles on Turbocharger Wastegates.
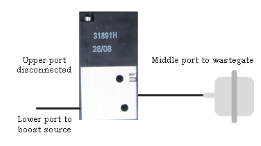
Using the method above, the 3 port solenoid is actually bleeding off boost through the third port causing the wastgate to “see” less pressure than the turbo is actually making. For example: Let’s say you have a 10 psi spring in the wastgate. If you ran the vacuum line from the turbo directly to the wastegate, then when the turbo hit 10 PSI of pressure the wastegate would open and 10 psi would be maintained. If you installed a 3 port electronic boost control solenoid in that wastegate reference line you could change the boost pressure the wastegate "sees". The solenoid now can “bleed” some of that pressure from the turbo off.
Let’s say that we set the boost control solenoid so that it bled off 4 psi of air pressure. What this would do is cause the engine and turbo to now make 14 psi of boost. The 14 psi would enter into port 1, and the solenoid duty cycle would bleed 4 psi of air pressure out port 3, making it so that only 10 psi came out of port 2. That 10 psi would open the 10 psi wastegate spring, and so 10 psi would be maintained on the spring, while 14 psi was maintained to the engine. If we wanted to run more boost, we would just increase the duty cycle to the solenoid causing more pressure to bleed off to the atmosphere making the wastegate see even less of the turbochargers pressure causing boost to rise even further.
This method should always be used for single port INTERNAL WASTEGATE set-ups and can be used for an external wastegate by leaving the top port on an external gate open to the atmosphere. Most internal wastegates have only a single port. For the internal wastegates that have multiple ports, you can use the other method we will describe below, but on a small internal wastegate it is often found that using any other method results in boost pressure spiking. “Spiking” means that the desired boost pressure is overshot and more boost is run than desired. An example would be wanting to run 15 psi of boost, but the engine always shoots to 19 psi of boost before coming back down to settle at 15.
The second method of routing (hooking up) an electronic 3 port boost controller
The second method is the perfered method for all external wastegates (even though you can hook up a boost controller using the method we spoke about above). The reason you want to use this method is it can offer increased wastegate control over the actuator, and can also keep the wastegate closed for longer periods of time before the desired boost level is reached. This helps the turbo to spool faster in off boost situations.
CLICK for larger image
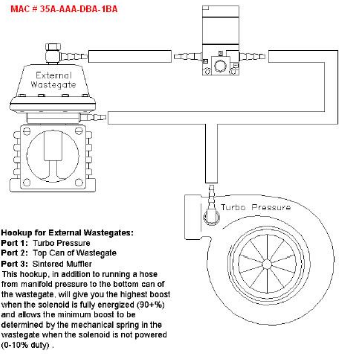
In the above photo you see that there is a port on the bottom of the wastegate diaphragm and a port on top. Using this method on our 3 port boost controller, we now not only route our turbocharged boost pressure to the solenoid, but we also route it directly to the bottom port of the wastegate. What this does is allows the bottom of the wastegate to see boost pressure at all times. Now I know what your thinking……if we do that than the wastegate will always be pushed open once we reach spring pressure, but just wait. You will put a “T” on this line and run the output of the T to the boost control solenoid. The output of the solenoid will then be run to top port on the wastegate diaphragm.
What we will be doing this time is using the electronic boost control solenoid to vary the amount of pressure that the top of the wastegate receives. Remember that in the first method we manipulated how much pressure was available to open the wastegate, while in this method we will manipulate how much pressure is actually helping the spring to keep the gate closed. Let’s do some expamples:
If we have a 10 psi spring in the wastegate, and the turbo is making 10 psi, and we have the electronic boost solenoid venting everything to the atmosphere, than the wastegate will open at 10 psi. This is because there would be 10 psi below the wastegate diaphragm, with a 10 psi spring fighting against it, with 0 psi helping the spring fight back. 10 psi will open a 10 psi spring so the wastegate opens and 10 psi of boost pressure is maintained.
To raise boost we start to decrease the amount of boost that is bleed off by the third port of the electronic boost control solenoid (so backwards of the above example because we are now on the other side of the wastegate diaphragm). Let’s assume we set the duty cycle to bleed off 5 psi of our 10 psi inlet pressure. This will cause 5 psi of pressure to be applied above the wastegate spring. What this does is essentially make the wastegate spring stronger. Since we had a 10 psi spring in the gate, we would now add our 5 psi of turbo pressure to that 10 psi spring for a total of 15 psi. Our wastegate will now behave as if it was a 15 psi spring. What we have essentially done is turned our wastegate spring into a variable spring. The reason why this boost control method is preferred over the method above is that by having a strong spring it will keep the wastegate closed more before reaching the desired boost level. By leaving it closed longer, more of the exhaust gasses will flow through the turbo causing it to spool faster. Many owners have noticed that when they increased the spring in the wastegate to make more power and run more boost, that the turbo also became a lot more responsive and spooled quicker. While this maybe wasn’t the goal it is a nice bonus.
Should I run a 3 port boost controller even if I just want to run wastegate pressure?
Many would tell you NO. They would say there is no reason to run an electronic boost controller if you don’t plan to run more boost than the wastegate spring. This is actually bad advice. By running a good boost controller you actually can increase the responsiveness of the turbo while still running the same amount of boost pressure as was explained in the above example. As an example let’s say we are running no boost controller and a 10 psi spring with our wastegate plumbed directly into our turbo boost reference source. You might think that the wastegate doesn’t open till 10 psi, but that would be false. If you actually use a pressure pump to work a wastegate that you are holding in your hand, you will see that the gate diaphragm will actually start to open with as little as 3-4 psi. What the 10 psi spring denotes is that the wastegate will be fully open at 10 psi, not what its “crack pressure” is.
If you have ever done research on other mechanical valves, like check valves, you will see that they are the same way. A check valve might be rated at 5 psi but will have a crack pressure of 2.3 psi. So the valve will be FULLY open at 5 psi, but will start bleeding pressure with as little as 2.3 psi. Because of this fact, even a car wanting to run the wastegate base spring pressure can benefit from a boost controller.
Cost of a 3 port solenoid?
If you have a stand alone ECU or factory ECU that can control a boost solenoid, than the cost is actually very resonable. This could be the cheapest mod an owner does to a boost car that improves the power and the response of the engine.
What is a 4 port electronic boost control solenoid?
A 4 port electronic boost solenoid is a solenoid with 4 ports of entry/exit. Unlike the 3 port controller above this one has the ability to have one more extra port that we can use to manipulate our boost control. The wiring of the solenoid is identical to a 3 port or even a 2 port solenoid.
How does a 4 port boost controller work?
The diagram below should be followed for plumbing in a 4 port boost controller:
Click for larger image
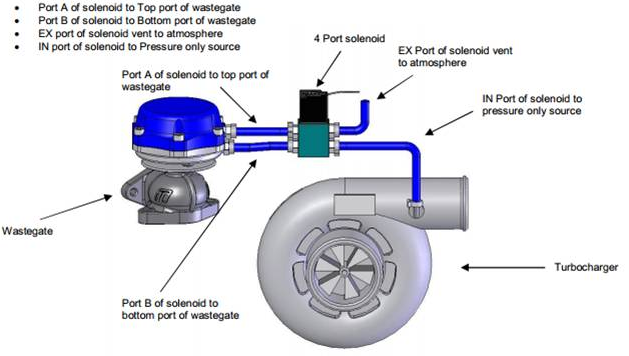
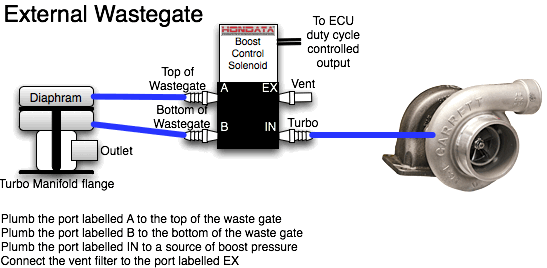
As you can see with a 4 port boost controller we have 4 ports to work with. Turbo pressure is routed into the solenoid in one of the ports while two other ports are routed to the upper and lower ports on the turbo wastegate diaphragm, with the 4th port being vented to the atmosphere. Let’s have a quick review to better explain how a 4 port boost controller works.
In our first example with the 3 port actuator we were bleeding boost to the atmosphere to “hide” boost pressure from the bottom of the wastegate diaphragm to raise boost. With our second method we were applying pressure to the top of the wastegate diaphragm to effectively raise or lower the applied spring pressure of the wastegate. Now in this last example of a 4 port we will have the ability to apply pressure to both the top and the bottom of the diaphragm effectively manipulating both sides of the wastegate. The 4 port set-up allows users to apply very little boost to the bottom of the diaphragm while applying lots of pressure to the top of the wastegate.
Which boost controller is better, 3 port or 4 port boost solenoids?
Neither. Both have their good and bad qualities. Let’s list them:
3 port solenoid boost controller
Pro’s
- Can provide faster spool up and boost response.
- Can provide 2x-2.5x more boost than base wastegate spring pressure.
Con’s
- Can cause over boosting if wastegate diaphragm is too small, or solenoid tuning from the boost controller is too aggressive.
- Can cause over boosting if wastegate placement and flow is of poor design on the turbo manifold.
4 port solenoid boost controller
Pro’s
- Can provide faster spool up and boost response.
- Can provide 4x-6x more boost than base wastegate spring pressure.
Con’s
- Can cause over boosting if wastegate diaphragm is too small, or solenoid tuning from the boost controller is too aggressive.
- Can cause over boosting if wastegate placement and flow is of poor design on the turbo manifold.
- Boost control resolution can be terrible. This means that just changing the duty cycle on the wastegate just 1% might swing boost by as much as 3-4 psi.
When do I need to move to a 4 port controller over a 3 port?
Many people think that there is no reason to ever use a 4 port controller. They say that with wastegate springs up to 21 psi there is no need to use a 4 port boost controller. This is because with a standard 3 port controller you should be able to get 40-55 psi of boost with a large base spring; Unless you're running a diesel engine than you should be good to go, but that is not the case. The problem with that sort of thinking, is you are now required to run 21 psi spring as a minimum boost pressure to be able to obtain boost as high as 40+ psi. While this may not have been needed years ago when 600 wheel HP was rare and traction was not a problem, that is not the case now. The scene has changed and turbo design has also changed to favor higher P. R. ratio’s. ECU’s, fuels, tuners, and parts have become better engineered and people are making more power than ever, but that doesn’t mean you want that power all the time. Traction is becoming the bigger problem than making power now.
One of the newest popular forms of racing spreading across the nation right now is “no-prep” type racing. In this type of racing it is more about traction management than it is about making monster amounts of power. These racers are often starting out with as little as 8 psi on the starting line, and wanting to finish the race with 40+ pounds, where the power can finally be put down at the end of the race track. A 3 port boost controller will not allow you to run a small wastegate spring and still obtain that level of boost pressure. This is where a 4 port comes into play. Yes the resolution of a 4 port isn’t as good as a 3 port, but having less resulotion isn't as much of a big deal when you have such a large spread from min boost level to max. For many racers the loss of resolution is easily worth the gain in min-max ability of boost . For street driven cars, especially FWD cars, this is a HUGE advantage. These big power street cars, or traction limited FWD cars, can go from being absolutely worthless burn-out machines to somewhat manageable.
Popular Boost Controllers:
In conclusion there are many different ways to control the boost in your turbocharged set-up. In the end its going to come down to the total combination of parts used, but assuming all the parts have been engineered to work well together, any level of boost control can be obtained. Hopefully you now understand the workings of boost control and the differences between a 3 port and 4 port boost control solenoid.
Be sure to check out the other articles located on enginebasics.com. If you have any suggestions for future articles or comments please contact us.
ATTENTION READER:
If you enjoyed the information and article you just read be sure to check out our newly released book with even more exciting photo's and information:How to Turbocharge and Tune your Engine
Want to know more about your particular Make and Model vehicle? All of these vehicles are covered in the tech, maintenance and repair articles found above. Enginebasics is the wiki or wikipedia of car part, repair, how to and tuning information. Let us be the class 101 for your automotive learning.
| Ford | General Motors GM | Pontiac | Jaguar | Land Rover | Nissan |
| Toyota | Honda | Lexus | Acura | Lotus | Scion |
| Infinity | BMW | Mercedes | Mitsubishi | Ferrari | Maserati |
| Lamborghini | Volks Wagen VW | Saab | Audi | Hyundai | Kia |
| Subaru | Mazda | Chevy | Volvo | Caddilac | Dodge |
| Chrylser | Daewoo | Porsche | Mercury | Freightliner | MG |
Individual Models
| Ford Mustang | Mitsubishi Eclipse | Mitsubishi Evo | Subaru WRX / STI | Dodge Viper | Chevrolet Corvette |
| Nissan Skyline | Honda S2000 | Nissan 350z | Toyota Supra | Chevy Camaro | Lotus Elise Exige |
| Honda Civic | VW Golf | Dodge SRT-4 | Eagle Talon | Acura Integra | BMW M3 |
| Nissan 240sx | Porsche 911 | Acura NSX | Honda Accord | Toyota Camry | Toyota MR2 |
| VW R32 | Dodge Truck | Mazda Rx7 | VW Jetta | Sand Buggy | Nissan Sentra |
For the latest Automotive news and stories visit the websites below |


Our feature Build: An AWD V6 Civic